Your new zero clearance insert has arrived, but there’s no opening for the saw blade. That’s intentional: the first cut creates a slot that matches your blade.
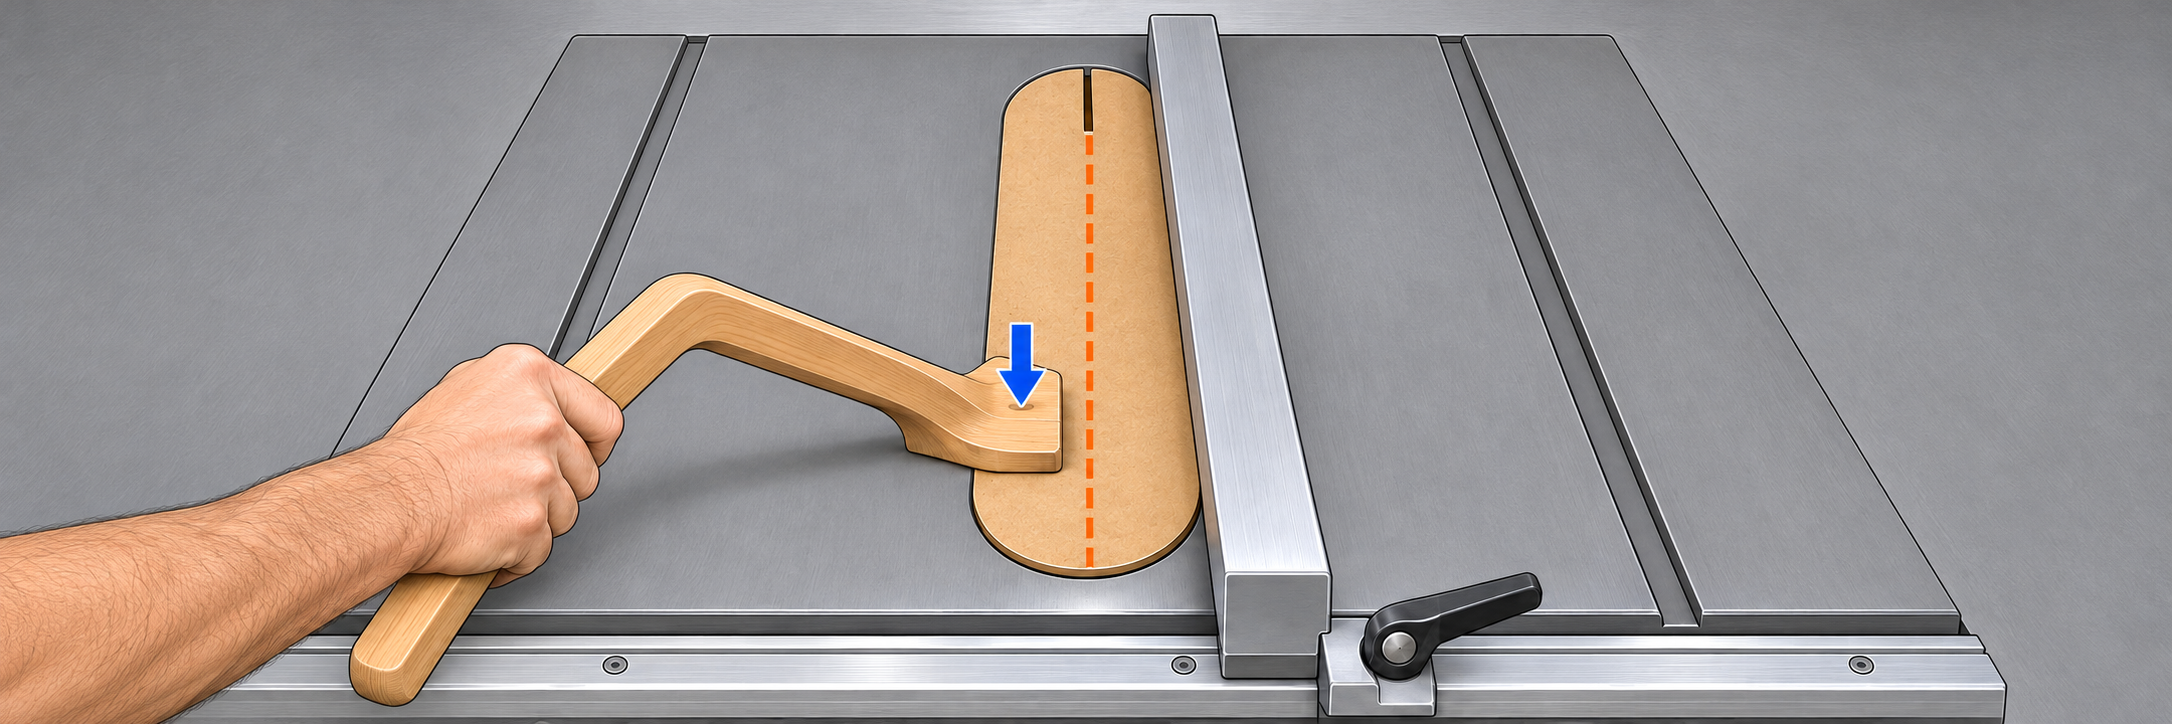
The basic process is to fit the insert with the blade lowered, lock the fence over its right edge, hold its left side down with a suitable push stick, and slowly raise the running blade through it. The insert stays in the table opening throughout the cut. The setup matters more than the cutting itself. We’ll walk through the fence-and-push-stick method first, then cover a clamped-board alternative.
This guide covers an uncut table saw insert with a standard blade at 90°. Miter saw inserts, dado stacks, and bevel setups need their own instructions. Follow the requirements for your exact saw and insert; if they conflict with this general guide, stop and resolve the difference before switching on.
Why the blade slot starts uncut
A zero clearance insert supports the underside of your workpiece close to the teeth, helping reduce tear-out. Cutting the opening with your own blade creates the close fit. A slot cut for a wider blade will leave more space around a thinner one.
Our ToolCurve zero clearance inserts ship with the blade opening uncut. The Standard table saw version has a separate riving-knife slot already cut; that opening is not the blade slot. Choose the insert listed for your exact saw model. See the product description and installation FAQs for those distinctions.
What you’ll need
- The correct insert and the blade you intend to use with it.
- A straightedge and the tool needed for any leveling screws.
- A compatible rip fence and a push stick with a stable contact foot. For the alternative method, use a sound, flat sacrificial board and suitable clamps.
- Eye and hearing protection, dust control, and respiratory protection appropriate for cutting the insert material.
1. Disconnect power and prepare the saw
Unplug the saw or remove its battery. Install the intended blade according to the saw manual, set it square to the table, and lower it fully. Remove the factory throat plate and clean the insert’s support ledges.
Check how the riving knife and guard assembly interact with the uncut insert and your chosen hold-down setup. Only reposition or remove components as required by the applicable setup instructions, with power disconnected. Plan to restore the required safeguards before cutting workpieces. DeWalt’s table saw manual, for example, requires checking guard and riving-knife alignment and clearance before operation.
2. Fit and level the insert
Seat the insert in its correct orientation. Engage any retention features supplied for that design. Adjust its leveling screws, where fitted, and check across the surface with a straightedge. The insert should sit stably at the height specified for your saw, without rocking or catching a workpiece.
Confirm that the fully lowered blade does not touch the underside. A plate resting on the teeth is not ready to cut. Do not force it down or switch on to make it settle. Check clearance using the method in your equipment instructions. Grizzly’s insert instructions specifically call for a properly fitted plate and blade clearance before startup.
3. Verify the blade path and lock the fence over the right edge
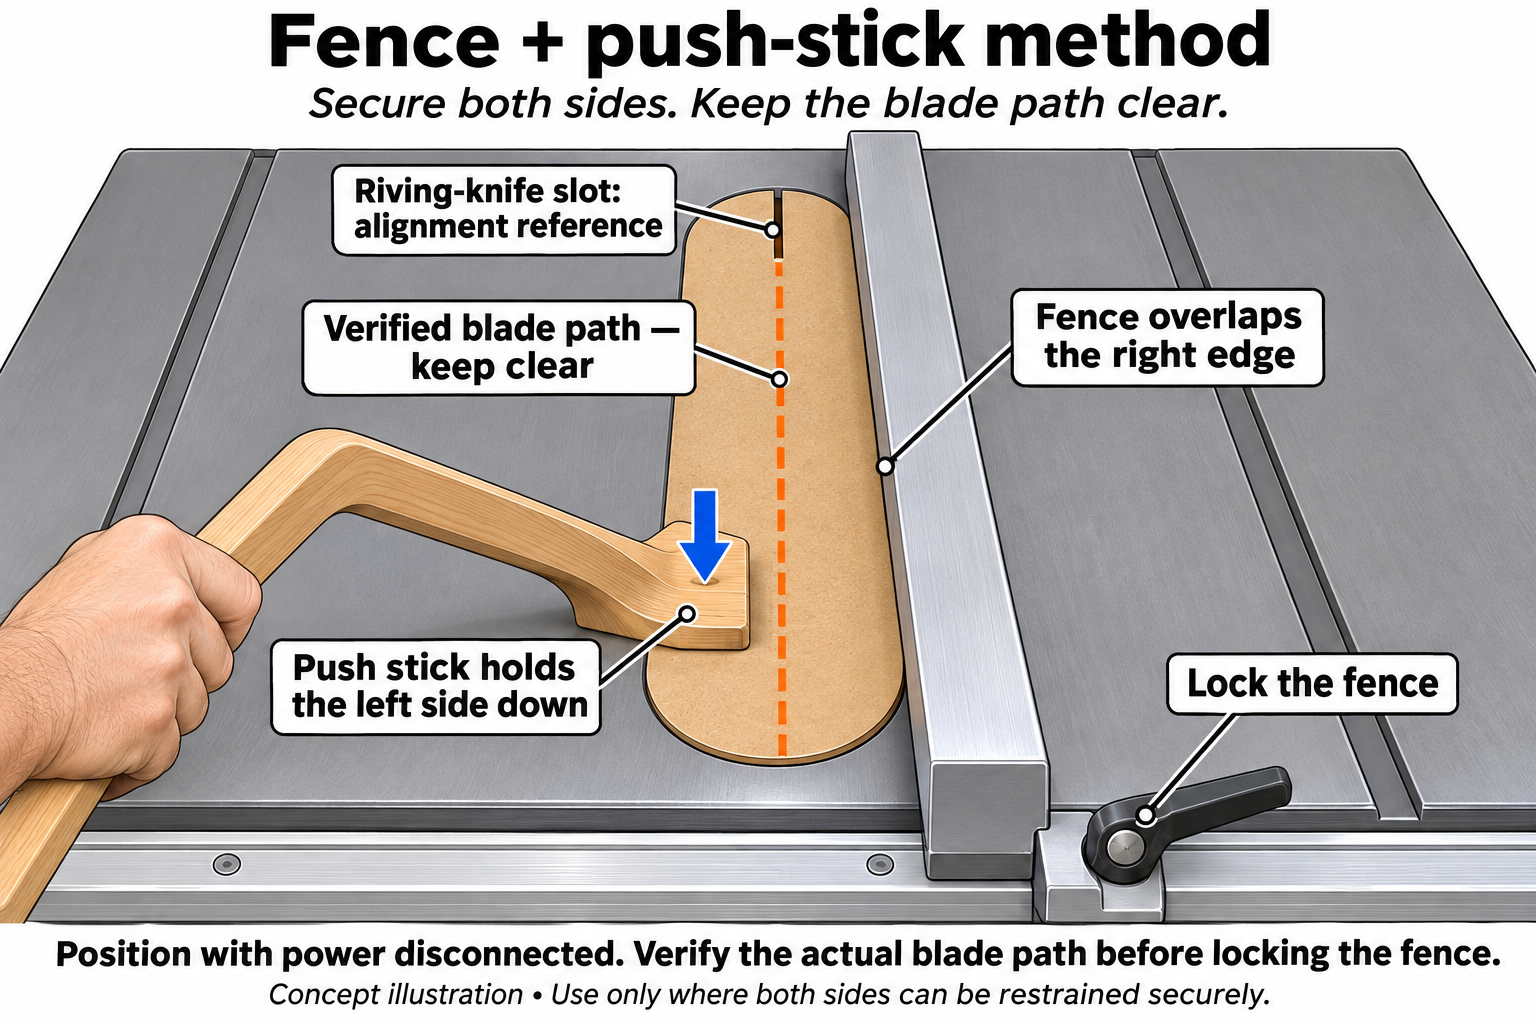
With power still disconnected, verify the blade’s actual position and the path it will occupy as it rises. The riving-knife slot helps indicate alignment, but do not use it as your only clearance check.
Slide the fence over a portion of the insert’s right side, parallel to and clear of the entire blade path. Engage the fence’s locking mechanism. Confirm that the fence actually restrains the plate against lifting. A fence resting beside the insert, or floating above it, does not hold it down.
This method depends on the geometry of your fence and insert. If the fence cannot securely restrain the plate while clearing the blade, use the clamped-board alternative below.
4. Hold the left side down with a push stick
Place the push stick’s stable contact foot on the left portion of the insert, entirely clear of the blade path. Keep your hand well away on the handle and apply steady downward pressure. The fence restrains the right side while the push stick holds the left side down.
Keep the insert stationary; do not push it forward. Never hold the plate down with your bare hand. If the stick can slip or the insert can rock, use the clamped-board method instead. Make sure you can reach the switch and height control without moving the stick or reaching over the blade.
Microjig demonstrates the same two-sided hold-down principle with a push block or wood scrap. Use a push aid that gives stable downward contact and keeps your hand clear; a narrow tip is not automatically suitable.
5. Raise the blade slowly through the insert
Remove the straightedge and loose tools. Once the setup is complete, reconnect power with the switch off. Stand clear of the blade’s line. Establish downward pressure with the push stick, keep the fence locked, and start the saw.
Let the blade reach operating speed, then use the height control to raise it slowly through the insert. Maintain downward pressure throughout. The blade cuts the opening as it rises; do not feed or move the insert. Stop at the setup height specified for your saw and insert, within the clearances you checked. Do not assume that every combination permits full blade height.
If the plate moves, the saw labors, or you hear unusual contact, switch off without reaching toward the blade and wait for a complete stop. Disconnect power before investigating. Grizzly notes that blade or arbor contact can limit available height; a resistance change is a reason to stop, not crank harder.
6. Stop, inspect, and restore the cutting setup
Keep the fence locked and maintain push-stick pressure while switching off and until the blade has stopped completely. Disconnect power and lower the blade before clearing the setup. Remove loose debris and check for cracks, displaced hardware, or movement in the insert.
Restore the riving knife, blade guard, and other safeguards required for the next operation. Check clearance and alignment according to the saw manual. Set the fence and blade height for your workpiece, then make a normal test cut in scrap using the appropriate guarding and push aids.
Alternative: secure the insert with a clamped board
A sacrificial board clamped over the insert is another way to prevent lifting. Complete the power-disconnected preparation, fit, and clearance checks in Steps 1 and 2 first.
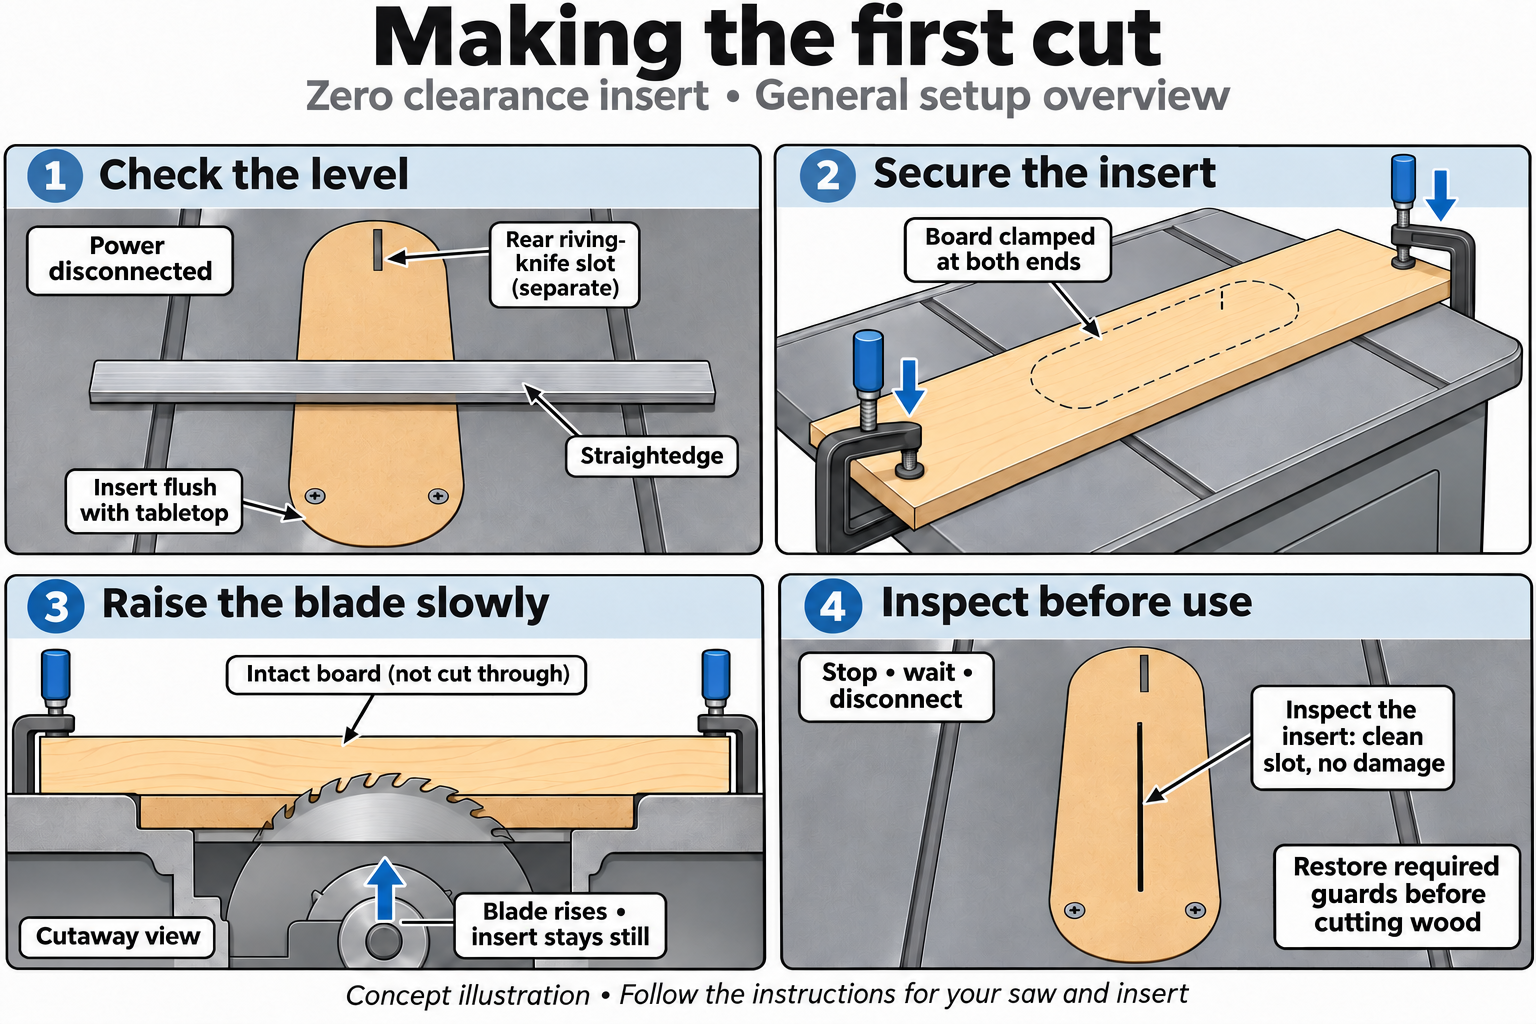
- Cover the insert and clamp both ends. Move the rip fence clear. Use a sound, flat board that fully covers the insert and extends far enough to clamp securely to the table at both ends. Keep all clamp hardware outside the blade’s entire cutting path.
- Preserve the hold-down throughout the cut. Choose a board and planned blade height that leave the board intact above the cut. Check that the clamps cannot shift and that you can reach the switch and height control without reaching over the blade area.
- Raise the blade slowly. With the setup complete and the switch off, reconnect power. Stand clear of the blade’s line and keep your hands off the tabletop. Start the saw, let it reach operating speed, and slowly raise the blade through the insert to the approved setup height within the clearances you checked. The insert and board stay stationary.
- Stop before removing the board. Keep the board clamped while switching off and waiting for the blade to stop completely. Disconnect power and lower the blade, then remove the clamps and board. Inspect the insert and restore the required safeguards as described in Step 6.
This board-and-clamps arrangement is described in Grizzly’s T23279 instructions and Powermatic’s zero clearance insert instructions. Those manuals apply to their own products; confirm the arrangement works with yours.
Common first-cut questions
The blade won’t lower far enough. What now?
Stop and confirm the insert model, orientation, and underside clearance. Some combinations need a manufacturer-specified starter-clearance procedure. The WOOD magazine demonstration uses a smaller blade, but that is not a universal substitution: saw compatibility, mounting, and kerf all matter. Contact ToolCurve with your saw and blade details before modifying the insert or substituting a blade.
Do I need another insert for a different blade or bevel?
Use a dedicated insert when you need a close fit for a different kerf or an approved bevel setup. Never tilt a blade while it is raised in a tight straight-cut slot. Some inserts do not permit bevel use at all. Powermatic’s instructions illustrate why the exact product requirements matter.
Does the first cut lock the insert in place or prevent kickback?
No. The cut creates blade clearance; it does not add a locking mechanism. The insert must remain properly fitted and retained as its design requires. A zero clearance slot also does not eliminate workpiece kickback. Continue using the required riving knife or splitter, guarding, and safe feeding technique. DeWalt’s manual explains kickback and the associated safeguards.
Find the insert for your saw
Browse our zero clearance inserts and match the exact model before ordering. For a standard table saw blade, choose the appropriate Standard version with riving-knife clearance. If you’re unsure about fit or first-cut setup, send us your saw model and blade details so we can help identify the next step.


Comments